

Do you sit all day while working in front of a computer? You may not know it, but chances are, you could be having very tight hips at the moment. Yes, you read that right. If you sit for long periods, the hip flexor muscles tend to shorten. This makes your hip feel tight and your movements are limited. At times, you may feel like it´s a little painful to walk or move your hips. The good news is, you can practice simple hip exercise methods to relieve the problem.
Importance of Hip Exercise
Other than long hours of sitting, there are other reasons why you get tighter hips. The following situations could cause this problem too:
- Long hours of driving
- Sleeping on one side or with one leg longer than the other
- Leaning into one side when standing
- Some underlying medical problems like arthritis, tendonitis, lupus and others
The most affected part when your hip gets too tight are your hip flexors. This include muscles of the inner hip, thigh muscles and gluteal muscles. This group of muscles are the ones responsible for raising your legs towards your torso. Basically, they allow full range movement of your hip joints. The same muscle group also stabilizes your hips and lower body. They make your lumbar spine and pelvic joints strong.
But why would you want to follow exercises for hips? Here are the benefits of such workout.
- Release hip tension or tightness
- Prevents hip and low back pain
- Improves your balance and posture
- Makes it easier for you to stand and walk for long periods
- Enhances your gait
- Increases your flexibility
- Decreases risks for injury in the spine and the hip
The good thing with any exercise for hips is the fact that they are so simple to do. You will not need specific gym equipment to follow a routine for your hips. Most of the hip exercises involve the use of your own weight and gravity to release hip tightness. Also, when you do hip exercises, other parts of the body will be included in the workout as well.
Best Hip Exercise to Relieve Tightness
The National Academy of Sports Medicine has suggested that foam rolling on the affected part of the hip can help relieve tightness. On a side note, foam rolling is a great form of hip exercise and can be used for most parts of your body too! It lengthens and strengthens you muscles making it easier for you to move in a full range of motion. You can learn more about it from our post Getting Fit with Foam Rollers.
Aside from foam rolling there are also other simple exercises for hips that you can follow. Some people use yoga poses that relieve hip tightness as well. Check some of the effective methods below. When you do the exercises below, you may want to keep a chair or a wall within your arms reach for support, in case you miss your balance
Yoga Poses
Yoga is a good way to treat your hips with some gentle care. There are various poses that you can do and if you love yoga, you can do a lot of poses to release the tightness on your hips. Here are some yoga poses that you may follow to relieve hip flexor tightness.
Frog pose
This pose can help stretch the inner thighs, groins and hips. It can also open the chest and shoulders. Aside from stretching it can relieve stress, anxiety and mild depression.

- Start by going on your knees and bring them apart at a comfortable distance.
- Flex your feet , not more than a 90-degree angle, until the inside edges touch the mat.
- Find your comfort in that position then lower down to your forearms.
- Carefully push your hip downwards. Move your knees farther apart for a deeper stretch.
- Keep the pose for 2 to 5 minutes as you breathe slowly and deeply.
This pose can be very intense, especially for beginners. A modification called the Half Frog pose uses bolsters, block or towels for support and cushion in some areas. You can check a video on a lighter modification of this pose here.
Happy baby pose
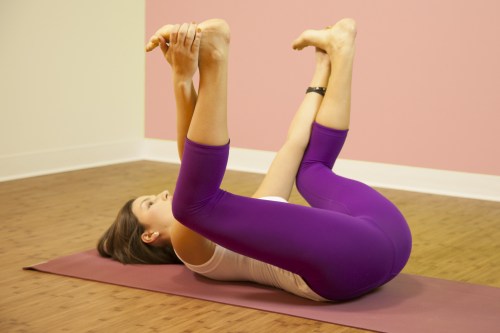
- Lay on your back while drawing your knees towards your chest.
- Place your arms in front of your shins as you hold the outside edges of your feet with your hands.
- Keep your chest and shoulders relaxed as you try to pull down your knees towards your armpit.
- Keep the pose at a comfortable level for minute or so.
Reclining Hero Pose
This pose is great to stretch the back, hips, legs and abdomen. It also opens the chest and restores a good posture. This pose is also good to improve digestion.

- Kneel with your knees touched together and your thighs perpendicular to the floor.
- Slowly slide your feet apart, slightly wider than your hips.
- Place the tops of your feet flat on the floor with you big toes angled slightly towards each other.
- Exhale and slowly lean backwards to the floor, putting your weight first on your hands, then to your elbow and forearms.
- As you lean on your elbows, place your hand at the back of your pelvis.
- Push yourself downwards to release the buttocks and the lower back.
- Finish the pose by going on to the floor.
This pose is quite a challenge especially for beginners. But, you can follow a modified version using supports like Yoga Eggs are great! They help you with proper alignment when you do your poses.
Reclining Bound Angle Pose
This pose helps in recharging your mind and your body, by calming the nervous system. It is also good for improving digestion, stretching inner thighs and enhancing external rotation of the hips. The pose is also known to enhance blood circulation in the lower abdomen.

- Lie on your back, making sure that you keep the natural curvature of your spine.
- Let the soles of your feet touch, while your knees are relaxed.
- You can bring your heels as close to the groin, but keeping it comfortable.
- Bring your hands with palms faced down to the two lower ribs, as you rest your elbows on the mat.
- Relax your shoulders down to keep it a little farther from your ears.
- Keep the spine on your neck long by tucking your chin a bit.
For beginners, you can tuck bolsters or rolled towels under your knees to ease the stretch a little. You can stay in a pose for 3 to 5 minutes or as long as you prefer.
Standing Stretch
Standing stretch is a method that starts at a simple leg lunge with a little help from your tailbone and your pelvis movements and some stretches. Watch Debra Atkinson teach you how to give some tender loving care for your hips with a simple standing stretch. check the video below (2.06 minutes)
Skater Squats
This routine is best done to train your hips, glutes (or the buttocks), outer thighs and quads.
Here are the steps to do this routine:
- Stand tall with your back straight.
- Set your legs straight and bring your feet shoulder-width apart.
- Clasp your hand in front of your chest.
- Do a slow squat by bending your hips and knees simultaneously, putting your weight on your heels (As you do this keep your back straight with your chest lifted as you inhale.)
- Now, release some air as you exhale, while you straighten your legs to stand and shift your weight to the left leg, raising your right leg to the side toes pointed forward
- As you inhale, bring your right leg back to the floor to a squat formation as you bend your knees and hips again.
- Exhale to release air as you push your legs up to stand. This time, shift your weight on the right leg, lift your left leg with toes pointing forward.
Steps 1 – 8 completes a repetition. You can do 8 to 16 reps for this exercise. You can choose to use only this routine, but you may also add variations in your hip exercise, as you prefer. You can check more about this routine here.
Seated Straddle Stretch
Practice a gentle and comfortable way to stretch your hips and manage tightness. This hip exercise helps your muscles stretch and relax , without going past your level of comfort. Learn a few tips from a long-time dancing instructor, Chell Garcia-Trias, with a traditional straddle stretch routine. Check this out (1.43 minutes)
Tips to go with Hip Exercise
The key to doing these kinds of exercises is to do them slowly and gently. You don´t have to force the release of the tightness immediately. If you may have noticed, most of the routines do not require fast or rigorous actions. Most of them are slow-paced, as you work your way on stretching your pelvis and releasing the tension.
- Avoid aggressive routines that will hurt your hips more
- Practice a good posture to prevent hip and back pain
- Observe good body alignment when seated
- Avoid standing on one leg
- Avoid sitting for very long hours
- When at work, stand up from your computer chair for about 5 minutes every hour
- Make sure you drink enough water daily to optimize lubrication in between bones
- If you workout regularly, make sure to get proper warming up and cooling down techniques to avoid straining the muscles
If you persistently feel pain or observe inflammation around your hips despite simple tension-releasing methods or any hip execise, then it may be good to have it checked with a specialist.
Do you have issues with hip tightness too? Let other women know how you managed it by commenting below.
Sign up for our newsletter and connect with us on Facebook, Pinterest and Twitter!

Gita is the founder of My Menopause Journey. Since 2014, she has been supporting midlife women by sharing hard-earned learnings from her own experience. To advance her knowledge, Gita puts a lot of her time and effort into understanding the broad spectrum of women’s health. She immerses in extensive research about the physical, mental and emotional aspects of menopause. Gita believes in the life-changing power of healthy, holistic living — this is where she anchors her message to all women. Learn more about her marvelous mission in About us - My Menopause Journey.

